Description
Colour: White
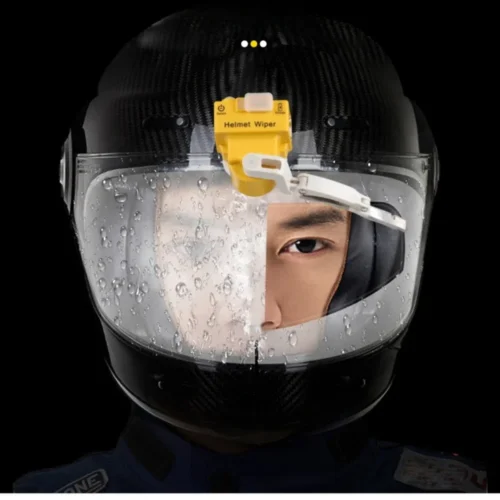
Practical helmet wipers allow you to maintain a clear vision even in rainy days and improve e safe of your riding. It has a wide range of applications and is suitable for most motorcycle and electric ycle helmets.
Specifications
- helmet with wiper
- Color: White/ Yellow(optional)
- Material: PVC
- Voltage: 5V
- Battery: Built-in 650mAh Li ium Battery
- Working Time: 2 hours
- Item Size: 45 * 40 * 50mm/ 1.8 * 1.6 * 2.0in
- Pa age Size: 140 * 100 * 70mm/ 5.5 * 3.9 * 2.8in
- Pa age Weight: 162g/ 5.7oz
Materials used in the product
- What about having a wiper like this on your protective cap during the blustery season?
- We will perceive how to make this all alone.
- Allow us to perceive what we need to make this.
- We really wanted a little Li-Po battery, a Li-Po battery charger module, an on/off switch, an Arduino Pro Mini, a servo engine, and a vacuum cut for helmet with wiper.
- We can begin the making methodology.
- In the first place, we wanted to make this servo engine waterproof.
- To do as such, I will seal every one of the parts from where water may leak in, utilizing an Araldite stick for a helmet with a wiper.
- As seen on the screen, I have fixed this load of parts so that water doesn’t leak in.
- Presently, we really wanted to associate Helmet with wiper.
- We wanted to glue these to the sides of the servo engine, utilizing a heated glue firearm.
Integrated battery
- We have glued the battery.
- On top of this, we will glue the charger module.
- We have stuck the battery and the charger module.
- Presently, we will glue the Arduino board on the contrary side of the servo.
- We have now stuck the battery, the charger board, and the Arduino board.
- We wanted to glue this switch here.
- Before that, let us associate these.
- Interface as seen on the screen.
- The program code to be utilized in the Arduino has been given in the portrayal box underneath.
- As should be obvious, I have associated them.
- The yellow wire from the servo, i.e., the sign wire has been associated with pin 9.
- Likewise, the force supply wires, i.e., the red and wires have been associated with the VCC and ground of the Arduino board.
- If we go to the part where the battery is stuck, we can see that the dark or negative wire has been associated with the adverse terminal of the charger module.
- We really wanted to fix this switch here.
- Allow us to turn it on and see.
- The servo engine is working like a wiper.
- Our associations are on the whole OK.
- We will associate the wiper to the cap utilizing a vacuum cut like this.
- To do as such, we really wanted to glue the vacuum cut thusly.
- We have stuck it here.
- Then, we wanted to make a cleaning hand here.
- Before that, let us keep it on ahead protector, and see.
- We will keep it here.
Materials used in helmet with wiper
- It fits entirely on the vacuum cut.
- Allow us to turn it on and see.
- We can cover this much region.
- Utilize an acrylic sheet to make the cleaning hand.
- Cut it looking like a square and curve the sides to frame a C.
- We wanted two pieces like this.
- This is the first.
- As said before, I have twisted it to the state of a C.
- To associate the subsequent piece, there are openings made here.
- We have stuck the connector of the servo here.
- A little strain spring has likewise been associated.
- The opposite finish of this spring must be joined to the subsequent piece.
- This is the subsequent piece.
- As referenced before, I have twisted this likewise looking like a C.
- There are little openings made on its sides, as well.
- Allow us to interface them now.
- This is the means by which its development will be.
- As said before, this is the place where we will associate the opposite finish of the spring.
- We really wanted to remove a piece of elastic-like this to interface underneath.
- These are the three pieces of the cleaning hand.
- We have removed this elastic piece from the washer of a tension cooker.
- That is the reason it is in a bent shape.
- To decrease its thickness, I have cut it in the center.
- Since the cap windshield is bent, we wanted a bent and adaptable elastic piece like this.
Construction of the helmet with wiper
- To associate this elastic part of the cleaning hand, we have glued a piece of plastic here.
- Allow us presently to interface these three sections.
- To do as such, we will utilize a pin like this.
- As said before, we will associate this spring with the subsequent piece.
- We will do this likewise by utilizing a pin.
- We utilized the strain spring to get this development.
- Presently, we will associate the elastic part of this.
- We have associated these three sections.
- This is the manner by which the wiper will work.
- Allow us to interface it to the servo engine and see.
- The hand is moving true to form.
- Allow us to put on the switch and see.
- The wiper is filling in true form.
- Presently, we wanted to make this wiper totally waterproof.
- These parts with the PCB can be spoilt if water leaks in.
- Likewise, this piece of the servo ought to likewise be made in such a manner to keep water from leaking in.
- Remove the overabundance parts of the pins utilized.
- We have removed the overabundance parts of the pins and glued them with the goal that they will not open.
- Since the strain spring is made of metal, it may get rusted.
- Thus, we have given the spring a protective covering.
- Going to the piece of the PCB, I have protected the charger module utilizing a craft glue weapon.
- To embed the charger link, I have made a little opening here.
- Utilize the equivalent miniature USB charging link that we use for our mobiles.
- While not on charge, it very well may be shut utilizing this elastic piece.
- In this way, water won’t leak in.
- We wanted to likewise protect the Arduino board.
Usages
- Utilizing a craft glue firearm, We have made it waterproof.
- The main part through which water may leak in now is the place where the cleaning hand and the servo are associated.
- For this, We have utilized a little elastic washer here.
- There is a shot at downpour water leaking in through this part.
- To forestall this, I will fix a cap on top.
- This cap will help in forestalling precipitation water from arriving at the shaft of the servo straightforwardly.
- The work on the wiper is finished.
- We will currently utilize splash paint on it.
- This is the last look at our wiper.
- Allow us to charge the wiper and see.
- We can see the charging sign here.
- We can likewise see the force on the sign here.
- The making technique of the wiper is finished.
- Presently, let us fix this on a protective cap and see.
- Companions, as should be obvious, this investigation is fruitful.
- This little wiper likewise has a battery reinforcement season of just about one 60 minutes.
- Drop your ideas in the remark box beneath.
Helmet with Wiper description
A helmet wiper can solve rainy troubles and make your travel safer.
Helmet with wiper built-in large-capacity battery, full charging can last about 2 hours.
e circuit is equipped wi overprotection and low voltage protection, making it safer to use.
Easy to install and use, wi a button at can be turned on and off wi one.
Made of high PVC, it is strong and not easy to break, and has a long service life.
Warranty is not applicable for this product.